Sunday, January 30, 2011

Homemade pizza

     I'll tell you, sometimes it is hard being me.  What am I talking about you may ask?  Well, I mean living up to the reputation of being the best pizza maker ever!  At least, that's what Scott says.  I will have to admit, my pizzas are pretty darn good.  So, how do I make them?  This is where my bread machine really comes in handy...
     I don't remember if I have stated my opinion of bread machines on this blog.  Knowing me, I probably have.  Anyways, if you don't remember, I think that bread machines make good bread (certainly better than what you can buy at most stores) but not as great as truly homemade bread.  A big part of that (I think) is that the rising time is shorter.  The longer a bread dough rises, the more flavorful it will be.  However, bread machines are certainly a time/effort saver (not that it really takes that much effort to make bread if you have a food processor).  One thing that the bread machine does make really well without cost to flavor (as far as I can tell) is pizza dough.  So, here's the recipe for bread machine pizza dough:

Note: This will make enough dough for a 15" circle.

Ingredients:

1 1/8 cup warm water
1 1/2 tbsp olive oil
3 1/3 cup AP flour
1 1/2 tsp salt
1 1/2 tsp sugar
1 1/2 tsp dry yeast

Procedure:

Add all ingredients to bread pan in the order given.  Set on "dough-only" feature (mine has a pizza dough setting).  When done, remove to floured board, if using immediately.

     After all this (non) work, you have a beautiful lump of pizza dough ready to go.  Now, if I were super talented I would throw it up in the air and spin it to make a pizza shape.  However, I am not that talented or coordinated so I just put it on a pizza pan, flatten it out, and roll it with a rolling pin.  The thing about working with dough that you have to remember is to give it time to relax.  When you start to work on dough, the gluten in it gets "elasticy" and it will start to go spring back so you can't roll it any more.  When this happens, let it rest for a few minutes and then try again.  I just roll it as far as I can and then go and prep ingredients (chop, cook, etc.).  After a few minutes have passed by, I repeat the process.  Eventually it will let you roll it all the way to the outer edges of the pan.  Now, since I don't do it throw it up in the air style, it tends to lead to a very thick crust (which I happen to like).  It is almost like toppings on bread.  Put whatever toppings on it you like.  I like to take a whole bunch of leftover stuff, slice it thin, and put it on.  I have used regular tomato sauce, pizza sauce and pesto sauce for a sauce.  You don't need to use too much, just put a little bit on and smooth it out with a spoon.  Shredded mozzarella is a good cheese to use.  I once made a pizza with a mozzarella base and goat cheese as extra.  Yum!  Top it with whatever you want (spread the toppings out evenly).  Put it in a 500 oven for 8-12 minutes or until the crust looks golden brown and the cheese is bubbly.  Let cool, slice and enjoy!

Here are a few pizzas I have made

My newest pizza.  Pizza sauce, chanterelle mushrooms, garlic, sliced ham and manzanilla olives

Pizza with thinly sliced sausage, black olives and artichoke hearts.

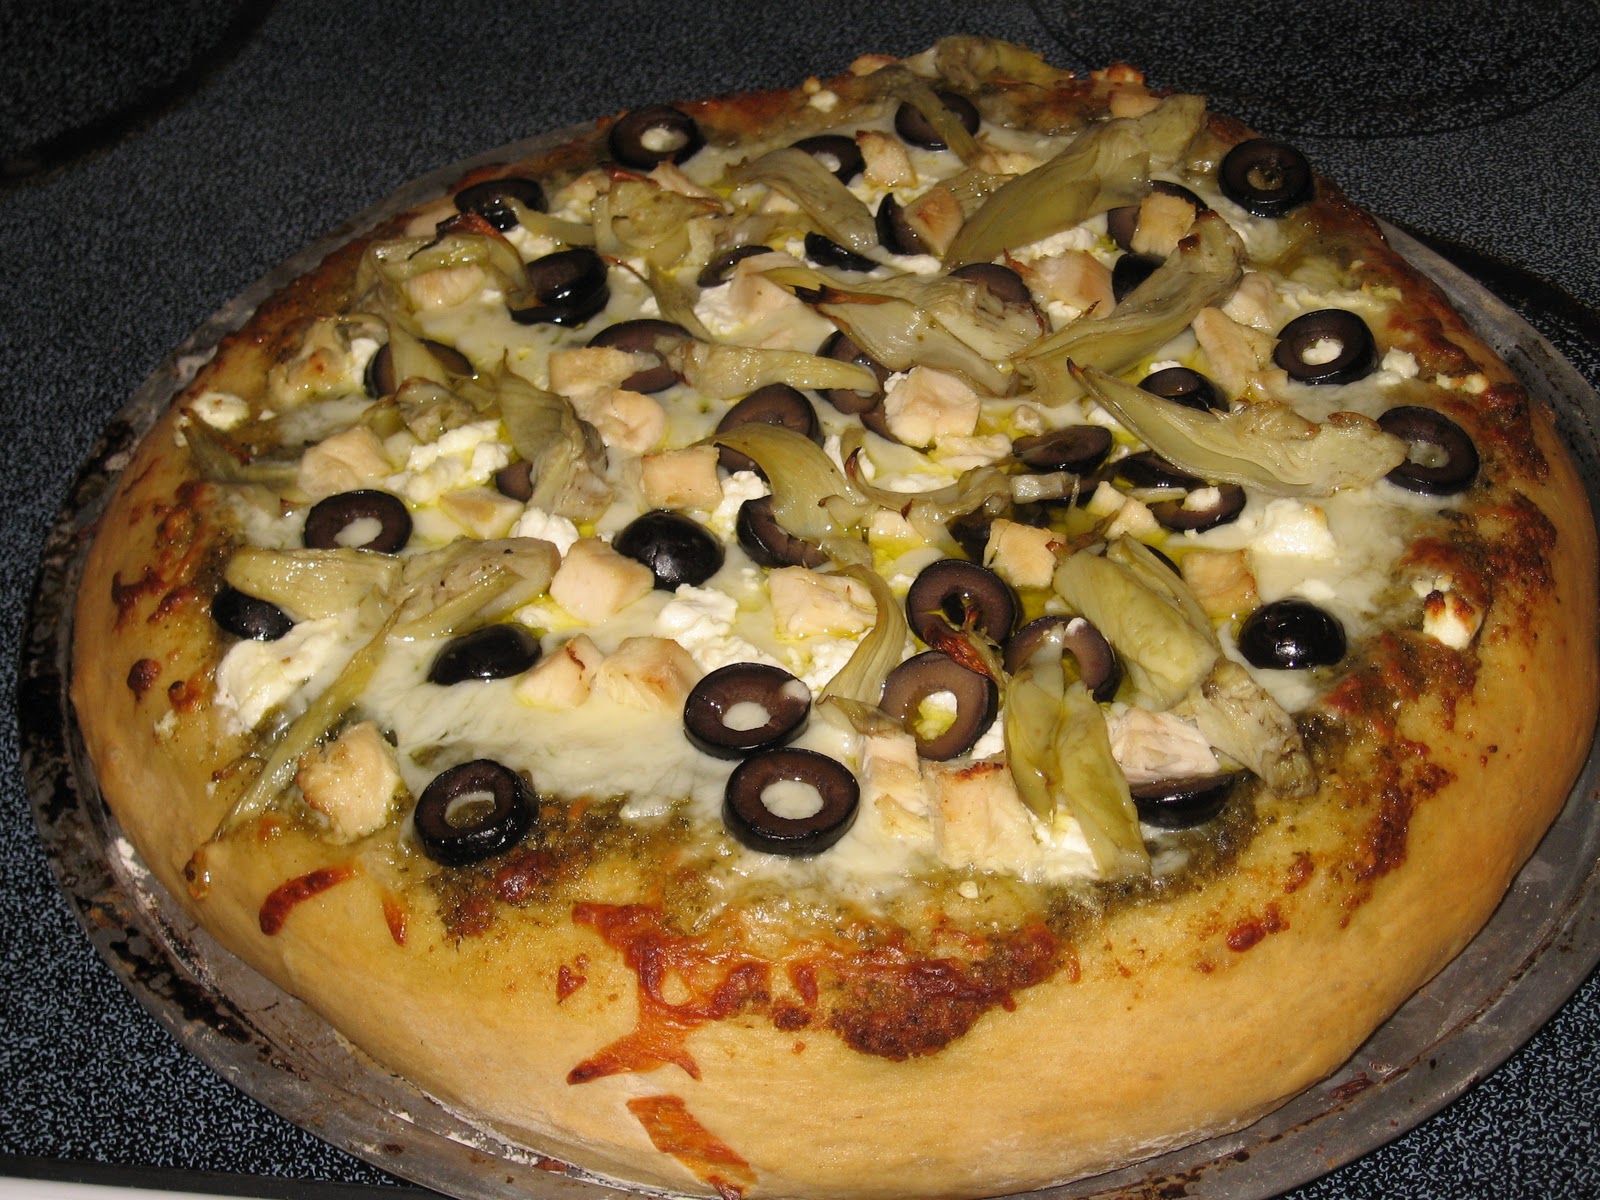
This one has pesto, chicken, olives, artichoke hearts, mozzarella cheese and goat cheese on it.
     Enjoy!  Let me know if you make one or if you want a non-bread machine recipe for pizza dough!

Baked apples

     After the success of last week's (or was it the week before?) applesauce, Scott and I decided to buy a whole bunch of apples at saturday's farmer's market.  I decided to buy a variety of apples (as recommended by Mark Bittman) and cook them all up.  There are many possibilities for this many apples.  One of them is baked apples. 
     Baked apples are delicious.  If you have never made them, I recommend going out and making them now!  They are a delicious very "desserty" snack that also happens to be good for you.  I am also fortunate that I own an "apple baker", a piece of pottery that allows you to bake the apples from the inside out.  Now, if you don't own one, please don't despair.  It is very easy to bake apples in the oven without some fancy piece of equipment.  Here is how I did it (keep in mind I only have two apple bakers).

Baked Apples

Ingredients:

2 apples (I believe I used Braeburn but am not 100% certain)
1/4 cup sugar
1 tbsp flour
3/4 tsp cinnamon
1/8 cup melted butter
chopped walnuts
2 tbsp water

(Whoo! I had to do a little math there as the recipe is for four apples!)

Procedure:

1) Peel and core the apples.  The instructions don't mention peeling, but I thought the ingredients would stick better to the apples if it was peeled.  From the final result, I seem to be right...
2) Mix together the sugar, flour and cinnamon. (The flour in this recipe will turn the juice into caramel).
3) Roll apples in the melted butter and then in the sugar mixture.  Put on the post of the apple baker.
4) Put on the nuts and add the water.
5) Bake at 350 for 35-40 min (I baked it for about an hour and it turned out really well!)
6) Enjoy!


Yum!  Here are the pictures:
Here is the apple baker.  It is hard to tell, but there is a post in the middle
that goes through the apple to bake it from the inside out

Close up of cinnamon/sugar/walnut/caramel goodness..

Wednesday, January 26, 2011

Leftovers crustless quiche and sourdough attempt #2

     Before I start this blog, I would like to give a big thanks to my friend Keri.  She posted this recipe for her crustless quiche and it sounded so good that I had to try it that day.  My beloved husband (to be) went to the grocery store and picked up more eggs so we could make it.  It is a very simple recipe, it used a lot of stuff I just had hanging around the fridge and best of all it was delicious! 
http://kiwikeri.blogspot.com/2011/01/crustless-quiche.html

Some ingredients that go well in this dish are:

rice of any kind or flavor
lentils
broccoli
bacon
any leftover meat
hash browns even frozen ones
yellow squash
mushrooms
quinoa
or anything else you can think of


HOW TO MAKE CRUSTLESS QUICHE:


1. preheat over to around 375
2. pull out all leftovers and assorted veggies from fridge
3. cut all veggies into small pieces trying to keep sizes uniform
4. put all your veggies into a glass pie pan, drizzle with olive oil, season with salt pepper, other seasonings ex. turmeric, Italian seasonings, garlic or garlic powder, etc. and stir until evenly coated
5. add meats and cheeses and stir again
6. fill pie pan close to full with yummy nibbles
7. Crack lots of fresh eggs, add a splash of milk (I use rice milk) and whisk. Usually requires 8-12 eggs
8. pour eggs into pie pan until all veggies and meat are covered with egg. You may need to crack more eggs if you have a lot of goodies in your pan.
9. cover with foil and carefully transfer to oven.
10. bake until mostly solid, then remove foil and bake until a knife comes out clean or the eggs in the center look fully cooked

     So, what did I put in it?  Leftover enchilada filling (chicken, cheese and onion) and leftover bread filling (corn and olives).  I ended up having to bake it for about 40 min uncovered and 20 min covered.  I am not sure if that is the right timing or not, as I also had bread baking in the oven as well.  It came out very good, but would have been better with green chiles and more cheese (what wouldn't have?).  But that is something to try for next time... I definitely think this is going to become one of my regular recipes.

     Which brings me on to the bread I tried to make.  I tried to make a Cornmeal sourdough bread with green chiles, corn and cheese.  Because of the sticky disaster that happened when I tried to make it by hand last time, I decided to try a recipe in my bread machine.  Long story short, I found out what happens when you put too much stuff in the bread machine.  It spilled all over its container into the bottom of my machine and even pushed the top up!  I had to finish baking it in the oven (thus the competition with the crustless quiche).  The bread came out well, but I didn't really taste any sourdough or green chile taste.  Scott said that it looked like a roast chicken when it came out.  What do you think?

Leftovers quiche

Green chile cheese cornmeal sourdough


Do I really look like a roast chicken?

Our dinner plate (with the ubiquitous salad)


Happy eater (while watching Julia Child)


Sunday, January 23, 2011

Homemade applesauce

     "So what do you want for Christmas, little girl?"  "I want a food mill to make applesauce!"  And that is indeed what I got!  Thanks to my mother's birthday/Christmas gift, I finally got a food mill of my very own.  It arrived last week and it took me until today to figure out how in the world to put it together.  Not that it is really that hard as it only consists of three parts; the main frame, the disc with the holes and the spinney part (love my technical language?).  I was playing around with it today and it finally just fit together!  I knew that I could finally make the recipe I have wanted to make for a while now: Applesauce!

Applesauce
makes about 2 quarts
Time: About 1 hour

Ingredients:
5 lbs apples, preferably a mixture of varieties, washed
Sugar if necessary

Procedure:

1) Cut the apples in half or, if they're very large, in quarters.  Don't bother to peel or core them. Dump them into a pot with about 1/2 inch of water on the bottom.  Cover the pot and turn the heat to medium.

2) When the water begins to boil, uncover the pot.  Cook, stirring occasionally and lowering the heat if the mixture threatens to burn on the bottom, until the apples break down and become mushy, at least 30 minutes.  let sit until cool enough to handle.  Taste the mixture and add sugar if necessary; usually it is not.

3) Pass the mixture through a food mill, discarding the solids that stay behind.  Freeze or refrigerate.

     It really is that easy!  And that delicious!  I used a mixture of apples, most of which I bought at New Leaf's (a local natural food store).  I used Pink Ladys, Honeycrisp and two random red apples from work.  At first, I was obsessed with poundage and then realized it didn't really matter how many apples I used exactly.  Since they were small apples, I cut most of them in half, put them in the pan and started cooking.  I'd say it took about an hour rather than a half an hour for them to cook down to very mushy, but I was using a stock pot (the narrowness of it probably delayed the cooking time).  Then I put the food mill over another pot, poured some of the mixture in it, and turned.  It was super easy!  And, as Mark Bittman said, it didn't require any sugar!  Yum!  I can hardly wait to tell Marie (who make applesauce every year or so and peels and cores the apples by hand).  She'll flip!


The apple "mush" in the pot


Putting it through the food mill


The homemade applesauce


Can you see the steam?


Of course, you have to enjoy it afterwards!  Yum!


Dinner for Derek and Lynelle

Last night we had over two dear friends, Derek and Lynelle.  They are the couple that Scott used to live with and whom I got to know quite well over the years of our dating.  We ran into them at a mutual friend's party and invited them over.  This is why I was preparing all that chicken stock last week.  They finally came over last night and we had a lovely time.  I cooked one of my favorite dishes from my southwestern cookbook along with a new recipe that I had never tried before.  What are the recipes?

Green Chile Enchiladas

Ingredients:
12 corn tortillas
Vegetable oil
4 cups cooked, skinned, and boned chicken breasts, diced (I just used my left over chicken)
1 1/2 cups grated Monterey Jack cheese
1/2 medium yellow onion, chopped
2 tbsp butter
2 tbsp AP flour
1 cup chicken stock or broth
2 cups milk
1/2 tsp garlic powder
1/4 tsp freshly ground black pepper
1 tsp ground cumin
2 mild long green chiles, roasted, peeled, seeded and chopped
1 1/2 cups grated Cheddar cheese

Procedure:

1) Heat just enough vegetable oil in a frying pan to lightly coat each tortilla and turn each tortilla in the hot oil just until soft.  Equally divide the chicken, Monterey Jack cheese and onion and place on each tortilla.  Roll up the tortillas and place in a lightly greased 9 x 13 inch glass baking dish.
2) Melt the butter in a cast iron skillet, briskly stir in the flour and cook over medium heat for 1 to 2 minutes, stirring of whisking constantly.  Then add the chicken stock and stir well.
3) Add the milk, garlic powder, cumin and green chile to the pan, bring it to a rolling boil, then reduce the heat and cook over low heat until warmed, stirring to blend everything.  Pour the sauce over the rolled tortillas.  Sprinkle with the grated Cheddar cheese and bake in a 325 degree oven for 30 minutes or until the casserole is hot and bubbly.  Serve at once.

Red Chile potatoes

Ingredients:
2 tbsp butter
3 tbsp olive oil
1 medium onion, cut in half lengthwise and sliced
4 large white potatoes, thinly sliced
1/2 tsp salt
1 tsp freshly ground black pepper
1 tsp ground mild New Mexico red chile, or to taste

Procedure:

Melt butter in a frying pan, add olive oil, and saute the onion for 2 to 3 minutes.  Add the potatoes, salt, pepper and ground red chile.  Saute, for 20 to 30 minutes or until the potatoes are done through and lightly browned.

     Where to start?  Well, let's start with the green chile chicken enchiladas. I used the leftover chicken from when I had made chicken stock so it was already all torn up, measured and ready to go.  I also modified the recipe slightly and cooked the onion a little bit before I mixed it up with the chicken.  I also rewarmed the chicken in with the cooked onion.  This is the third or fourth time that I have made this recipe (maybe even more times) and I have found that if you don't cook the onion ahead of time it doesn't cook through in the oven.  Then you get a raw onion taste in your enchiladas and you mix out on the deliciousness of cooked onion.  Mmmm....  This was also the first time in all that cooking that I actually didn't set off the smoke alarm while cooking the tortillas.  Maybe it was because I had it on lower heat.  Maybe it was because I had the vent going on high the whole time.  Either way about it, I am very glad that it didn't go off.  I realized after the fact that somehow or another I hadn't cooked enough tortillas (although I swore I counted them up correctly!) and so I microwaved a few to get them soft and added them in.  The sauce was easy to make, too.  Just one word of note:  If possible, please use actually New Mexico green chiles.  They make a difference.  The canned ones suck!  I used about four or so to give it that good taste.  Oh, and I used a Monterey Jack already shredded blend from the Grocery store.  So good!  Derek and Lynelle really enjoyed them too!  Lynelle was impressed that I had made my own sauce!
     The potatoes came out great as well, although they were nothing fantastically special.  Just your normal potato kind of dish.  I didn't read until I put the recipe up that you were supposed to slice the onions, so I just roughly chopped them up.  I was very grateful to the food processor when it came to slicing all the potatoes, though!  I also only used half an onion as that was what I had left from the enchilada recipe.  Since I didn't have any red New Mexican chile powder, I used 1/2 Cayenne pepper and 1/2 Chile powder.  It turned out delicious!

Cooking dinner

Green chile chicken enchiladas


Red Chile potatoes

Our dinner plate

Lynelle and Derek enjoying a good meal

Scott happily eating his food

Sweet potato fries

     This is going to be another of those multi-blog posts, as I have made quite a few things in the last few days.  So, I'll go in chronological order starting with:

Sweet potato fries

Ingredients:
4 medium baking potatoes or sweet potatoes (I obviously used sweet)
2 tbsp oil
1/2 tsp salt

Procedure:

1) Scrub and dry potatoes (peeling is optional).  Cut into thin sticks or wedges and place in large container with a tight lid.  Pour oil on potatoes, cover, and shake to thoroughly coat fries with oil.

2) Sprinkle salt on fries and mix.  Spread fries in a single layer on baking sheets.  Bake in preheated oven at 425 F until golden brown and fork tender, 30-45 min, stirring and flipping fries ever 5-10 minutes.  Serve immediately.

     So before I start talking about the recipe itself, I should mention that I first learned of this recipe from Leah this past Christmas break.  She was the one who first introduced me to the Simply in Season cookbook.  As I looked through the Simply in Season book, I realized this was the recipe that Leah had made, only she did it a little differently.  Now, on to the recipe.
     It turned out okay.  Leah herself said that sometimes this recipe turns out great with the fries nice and crispy and sometimes it turns out okay, with the fries cooked but more mushy.  I definitely had one of the more mushy experiences.  We still had cooked fries (some were burnt) but none of them had the crisp texture I was looking for.  It honestly came out so mediocre that I am double thinking of ever trying this recipe again.  However, as I said earlier, Leah did things differently.  When she did it, she just cut up the fries and then poured olive oil over them on the baking sheet mixing them around so every one would get evenly coated.  When I did it, I followed the original recipe and mixed it in a bowl.  The two tablespoons of olive oil were not nearly enough to cover the fries, so that could be part of the problem.  I made them in three batches.  On one I just sprinkled salt.  On the second, I sprinkled half with cayenne pepper and half with curry powder.  On the third one, I sprinkled garlic salt and a garlic cheese mix.  Unfortunately, they all came out pretty mediocre.  At least they were semi-what healthy. 
     The other difficult thing about this recipe was cutting up the sweet potatoes.  Scott got a type of sweet potato that I had never seen before.  It was more whitish like a regular potato than brown.  It was also really difficult to cut through.  I have been aware for some time that I need to sharpen my knives.  This brought that realization to the fore.  I have tried over the past few days to sharpen knifes using a sharpening wheel and then a butcher's steel but had no luck with either.  I am sure it is just my incompetency rather than the sharpeners themselves.  Or maybe I just have bad knives....

The first two batches of sweet potato fries

These ones were flavored just with salt and turned out a little crisper

This was the Cayenne pepper/Curry powder bunch.  They were much softer.

Sunday, January 16, 2011

Peanut Apple Salad

I love recipes that use up leftover ingredients.  Especially when those are leftover ingredients from other recipes that you have made.  I have been inspired by our friends (and ex-wolfies) Jason and Leah when we go and visit them over the Christmas break holiday.  One of the ways that they have inspired me is to introduce me to the cookbook I used for this recipe, Simply in Season by Mary Beth Lind and Cathleen Hockman-Wart.  Simple premise for a cookbook: eat local and eat those foods that are in season.  We are fortunate here on California that a lot of those foods that would be out of season anywhere else are still in season here.  However, it is still difficult to get some foods (how I miss the days of summer fruit in the middle of winter!).  Anyways, I ordered this cookbook as a Xmas present and stumbled across this recipe for Peanut Apple salad.  It uses up leftovers I had from making the red beans and rice (coconut) and the winter bean soup (celery).  I didn't have any raisins (and I don't like them) so I skipped that part.  Anyways, here's the recipe:

Peanut Apple Salad

8 apples, chopped
1/2 cup raisins
1/2 cup peanuts, pecans, or walnuts
1/4 cup shredded coconut

Combine in large bowl.  Set aside.

1/2 cup peanut butter
1/2 cup mayonnaise
1/4 cup milk
1/4 cup sugar

Combine then pour over salad.

I know- sounds weird- peanut butter and mayonnaise?  But it works.  I think the sugar helps bind the tastes together and the milk gives it a creamy consistency.  I think it could definitely benefit from something like raisins as it is very crunchy without them.  Not bad, but I think raisins or another dried fruit would provide an excellent contrast in textures.  Enjoy!


Simple and delicious


Plus it is healthy for you, too!