Saturday, February 5, 2011

Fresh pasta (aka homemade ravioli)

     I think I have officially decided I am addicted to cooking.  It is a sickness; filling up my off hours, creating loads of dishes, expanding my waistline... If only it weren't so gosh darn fun!  And delicious!  People become addicted to drugs because they release dopamine (our pleasure neurotransmitter).  Sex and good food do the same.  Well, I suppose technically, any type of food; but I like to think that homemade food releases even more dopamine.  It certainly gives you a sense of achievement and reward that buying something pre-packaged does not.  My brain eats, thinks and dreams about food.  I stay up late at night reading cookbooks.  I think about what I am going to make for dinner on my off time.  And, sometimes, I wake up in the morning with cooking impulses.  All of which, of course, brings us to this blog's recipe: homemade pasta.
     I woke up Wednesday (I think... although it might have been Thursday) with an impulse to make fresh pasta.  I don't know where it came from; I hadn't read anything on pasta making or watched anything.  I just woke up and bam! there it was.  It kept coming into my head again and again so of course I had to research it.  My first source I looked at made it seem a little difficult.  However, I went back to my always loved How to Cook Everything cookbook and looked at the recipe for that.  Mark Bittman made it seem possible; maybe even easy!  I have known other people to make fresh pasta; and they always said that it was a lot of work.  Could I do it and still have fun?  Well, as it turns out, the answer was yes.  And it wasn't nearly as difficult as I feared!

Ingredients


2 cups (10 ounces) all‐purpose flour, plus more as needed
1 teaspoon salt
3 eggs
A few drops water, if needed

Procedure:
1) To make the dough by hand, mound the flour on a smooth counter top, or place it in a bowl. Make a well in the center and add the salt. Then break in an egg, beating with a fork and incorporating a little of the flour. Beat in another egg and repeat, until all the flour is mixed with the eggs. Gather the mixture in a ball.
     To make the dough in a food processor, combine the flour and salt in the container and pulse once or twice. Add the eggs all at once and turn the machine on. Process just until a ball begins to form, about 30 seconds. Add a few drops of water if the dough is dry and grainy; add a tablespoon of flour if dough sticks to the side of the bowl.


2) Turn the dough out onto a dry, lightly floured work surface and knead until it is smooth, just a minute or two. Add water by the half‐teaspoonful if the mixture is dry; add flour if it is sticky. This should be an easy dough to work. Cut the dough into 6 pieces; wrap 5 pieces in plastic.


3) Roll the dough out with a pin until it is as thin as you can make it or use a manual pasta rolling machine.

     I will have to admit that I saved myself time by using two machines; a food processor and a manual pasta rolling machine.  A big thank you to Tiffani and Mickey at WOLF for letting me borrow theirs!  I had to remove a drawer from my kitchen to clamp it to my counter but it worked brilliantly!  It saved you a lot of rolling time and was super fun, to boot!

Instructions for a machine (paraphrased by me)
Prepare your machine.  Sprinkle a nearby surface with flour.  Put one of the six dough balls through the machine at level 1.  Flour the dough if necessary to keep from breaking.  Keep increasing the level each time until you get to level 6.  Super easy!


The pasta machine and filling for the ravioli all ready

One of the six lumps of doughs, rolled in flour

First pass through the machine


What the dough looks like after its first pass


Using the pasta machine


Second pass


Third


Fourth


Fifth


Sixth and final pass
     Now, on to the filling.  I thought that since I was going through all this trouble of making homemade pasta  that I might as well make it even more delicious and make homemade ravioli.  Now, I love ravioli.  I don't usually order it at Italian restaurants because they never give you enough.  Has anybody else noted this?  If you order lasagna, or fettuccine, or spaghetti they give you loads!  However, order ravioli and they'll give you maybe six (if you're lucky).  After making the ravioli from scratch, I think I can start to see the reason why...
     First, the filling:

Ricotta and Spinach Filling for Fresh Pasta


Ingredients:


10 ounces spinach, cleaned and trimmed
1 egg
1 cup ricotta, preferably fresh, drained for a few minutes in a fine strainer
1 cup freshly grated Parmesan cheese
Salt and freshly ground black pepper to taste
1/2 teaspoon freshly grated nutmeg

Procedure:

1) Plunge the spinach into boiling salted water; remove it 30 seconds later. Drain, cool, and chop finely.


2) Combine the spinach with the remaining ingredients; taste and adjust seasonings if necessary. Use to fill the pasta immediately, or refrigerate for up to a day before using.

     Making the filling might have been the most difficult part.  Stuffing the ravioli was tedious and time consuming, but not too difficult (although you did have to watch out for stickiness).  I just had a hard time getting all the spinach out in time and drained and finding enough counter space and you get the picture.  However, I mixed all the ingredients in the food processor turned it on for 30 seconds or so and voila- pasta filling!

How to make ravioli (again, paraphrased by me)

1) On one of your flat (level 6) roll of pasta, put a small (small) teaspoonful of filling every inch or so on the pasta. 

2) Brush water all around the filling.

3) Take another sheet of pasta and put it over the top.

4) Seal it down with your fingers and then cut it with a knife.

5) Complete the seal by using a fork to press around the edges.  It helps to flour the fork or else it will stick.

6) Store the ravioli separately until ready to cook.

(You can also only fill one half of the sheet and fold the other half over it)


Putting on the filling


Sealing the edges


The final ravioli

36 in all!

Leftover pasta bits that I made into fettuccine


Close up of the spinach cheese filling.  A little water has separated out


The final, cooked product.  They may not look perfect, but with a little
bit of olive oil they tasted perfect!

Enjoying dinner!

As Julia Child says, "Bon Appetit!"
     So that's all folks.  It really was not that hard at all.  As I mentioned earlier, the most time consuming and tedious part was making the ravioli itself.  With Scott's help, it probably ended up taking about an hour or so.  Making the filling took maybe 10-15 minutes (including the time it took for the water to boil).  The dough whipped up in about five minutes.  I stored it in a tightly wrapped plastic bag for about a couple of hours, simply because I didn't want to make the ravioli right away.  I still have lots of leftover filling, so I might try making more ravioli or tortellini tomorrow.  I think I might also make some spaghetti or fettuccine since it would be a blast in the machine.  I've got to take advantage of the pasta machine while I can!  I definitely want to own one someday!  Best of all, it was super fun!  The ravioli pasta part had a subtle delicious egginess to it and the filling was divine.  It tasted good cold but was so delicious hot (with all the melted cheese and spinach).  A little bit of olive oil on top just made the grade.  Yum!!!  I hope I've inspired you to go out and maybe try making your own pasta one of these days.  It is a fun process and everyone can do it!

Friday, February 4, 2011

Mint chip brownies

     The idea for these brownies took a long and myriad trip before ending up in my stomach tonight.  Part 1: Eating delicious (probably the best ever!) brownies at Russian River brewing company while on vacation this summer.  Part 2: Wanting to replicate that feeling and taste at home.  Part 3: Realizing the brownies were good (although not as good as Russian River brownies) but would be even better with mint chips.  Part 4: Long desperate search for mint chips.  Seriously, they don't sell them anywhere!  Part 5: Final discovery of mint chips (and salt pork [but that's another story...]) at a Henry's Market in my hometown of San Pedro, CA in November.  Part 6: Bringing said mint chips up in my car where they sat in the cupboard until today.  Part 7: Finally making the brownies. 
     What do you think?  I think it could make a riveting Hollywood blockbuster.  There's drama, suspense, a mystery, discovery and a super sweet ending.  Alright Hollywood producers, eat your heart out!


Mint chip brownies
Time: 40 minutes

Ingredients:
2 ounces unsweetened chocolate, roughly chopped
8 tablespoons (1 stick) unsalted butter, softened, plus a little more for greasing pan
1 cup sugar
2 eggs
1/2 cup all-purpose flour
Pinch salt
1/2 teaspoon vanilla extract
1/2 cup toasted walnuts
3/4 cup mint chips1. Heat oven to 350 degrees. Combine chocolate and butter in a small saucepan over very low heat, stirring occasionally. When chocolate is just about melted, remove from heat, and continue to stir until mixture is smooth. Meanwhile, line an 8-inch-square baking pan with greased aluminum foil.
2. Transfer mixture to a bowl, and stir in sugar. Beat in eggs, one at a time. Add flour, salt and vanilla and stir to incorporate. Stop stirring when no traces of flour remain.  Add in the nuts and mint chips.
3. Pour into pan, and bake 20 to 30 minutes, or until set and barely firm in the middle. Cool on a rack before cutting.


Yield: About 1 dozen brownies.

     Of course, Scott and I couldn't wait until they cooled which meant we had a very warm, crumbly, melty brownie cake.  Oh my, but it was delicious!  I think I can feel my waistline expanding now!


The chocolate sugar mixture

The final batter

Out of the oven

Close up on mint chip goodness...

Leftover lentil soup

     For a while now, I have been wanting to make a lentil soup.  I figured it should be pretty easy, delicious and simple to make.  Well, I finally followed my own advice of easy soup making (i.e., just make it up!) and made lentil soup.  I will have to admit that I did look at quite a few recipes to get an idea of what they put in it.  However, the finally choice of ingredients was mine and mine alone.  Why do I call it leftover lentil soup?  Because I kind of put whatever I had on hand into the soup.  I can't tell you the exact proportions as I just eyeballed it, but the recipe went something like this:

Leftover lentil soup

Ingredients:
6 cups chicken stock
lentils (1 cupish?)
carrots, cut up
red onion, chopped
leftover brown rice (cupish?)
ham, cut into squares (1/2 cupish??)
thyme
salt and pepper to taste
bay leaf
Italian seasoning
olive oil

Procedure:
1) Cook the onions and carrots in the olive oil until they soften.  I like to put the onions in first and then the carrots.
2) Add in the rest of the ingredients (except the rice) and simmer for about 30 minutes.
3) Taste, adjust the seasoning if you desire and add in the rice.  Let it cook for another couple of minutes or so so the rice has time to warm up.
4) Enjoy!

It is even more delicious the next day, as everything has had a chance to marinade in the flavors.  I ended up accidentally adding in a lot of thyme, but it really tasted great.  The lentils really soaked up a lot of the excess moisture, so it is now more lentils than soup.  But it is still delicious!
Cooking in the pot
Mmmm...

Sunday, January 30, 2011

Homemade pizza

     I'll tell you, sometimes it is hard being me.  What am I talking about you may ask?  Well, I mean living up to the reputation of being the best pizza maker ever!  At least, that's what Scott says.  I will have to admit, my pizzas are pretty darn good.  So, how do I make them?  This is where my bread machine really comes in handy...
     I don't remember if I have stated my opinion of bread machines on this blog.  Knowing me, I probably have.  Anyways, if you don't remember, I think that bread machines make good bread (certainly better than what you can buy at most stores) but not as great as truly homemade bread.  A big part of that (I think) is that the rising time is shorter.  The longer a bread dough rises, the more flavorful it will be.  However, bread machines are certainly a time/effort saver (not that it really takes that much effort to make bread if you have a food processor).  One thing that the bread machine does make really well without cost to flavor (as far as I can tell) is pizza dough.  So, here's the recipe for bread machine pizza dough:

Note: This will make enough dough for a 15" circle.

Ingredients:

1 1/8 cup warm water
1 1/2 tbsp olive oil
3 1/3 cup AP flour
1 1/2 tsp salt
1 1/2 tsp sugar
1 1/2 tsp dry yeast

Procedure:

Add all ingredients to bread pan in the order given.  Set on "dough-only" feature (mine has a pizza dough setting).  When done, remove to floured board, if using immediately.

     After all this (non) work, you have a beautiful lump of pizza dough ready to go.  Now, if I were super talented I would throw it up in the air and spin it to make a pizza shape.  However, I am not that talented or coordinated so I just put it on a pizza pan, flatten it out, and roll it with a rolling pin.  The thing about working with dough that you have to remember is to give it time to relax.  When you start to work on dough, the gluten in it gets "elasticy" and it will start to go spring back so you can't roll it any more.  When this happens, let it rest for a few minutes and then try again.  I just roll it as far as I can and then go and prep ingredients (chop, cook, etc.).  After a few minutes have passed by, I repeat the process.  Eventually it will let you roll it all the way to the outer edges of the pan.  Now, since I don't do it throw it up in the air style, it tends to lead to a very thick crust (which I happen to like).  It is almost like toppings on bread.  Put whatever toppings on it you like.  I like to take a whole bunch of leftover stuff, slice it thin, and put it on.  I have used regular tomato sauce, pizza sauce and pesto sauce for a sauce.  You don't need to use too much, just put a little bit on and smooth it out with a spoon.  Shredded mozzarella is a good cheese to use.  I once made a pizza with a mozzarella base and goat cheese as extra.  Yum!  Top it with whatever you want (spread the toppings out evenly).  Put it in a 500 oven for 8-12 minutes or until the crust looks golden brown and the cheese is bubbly.  Let cool, slice and enjoy!

Here are a few pizzas I have made

My newest pizza.  Pizza sauce, chanterelle mushrooms, garlic, sliced ham and manzanilla olives

Pizza with thinly sliced sausage, black olives and artichoke hearts.

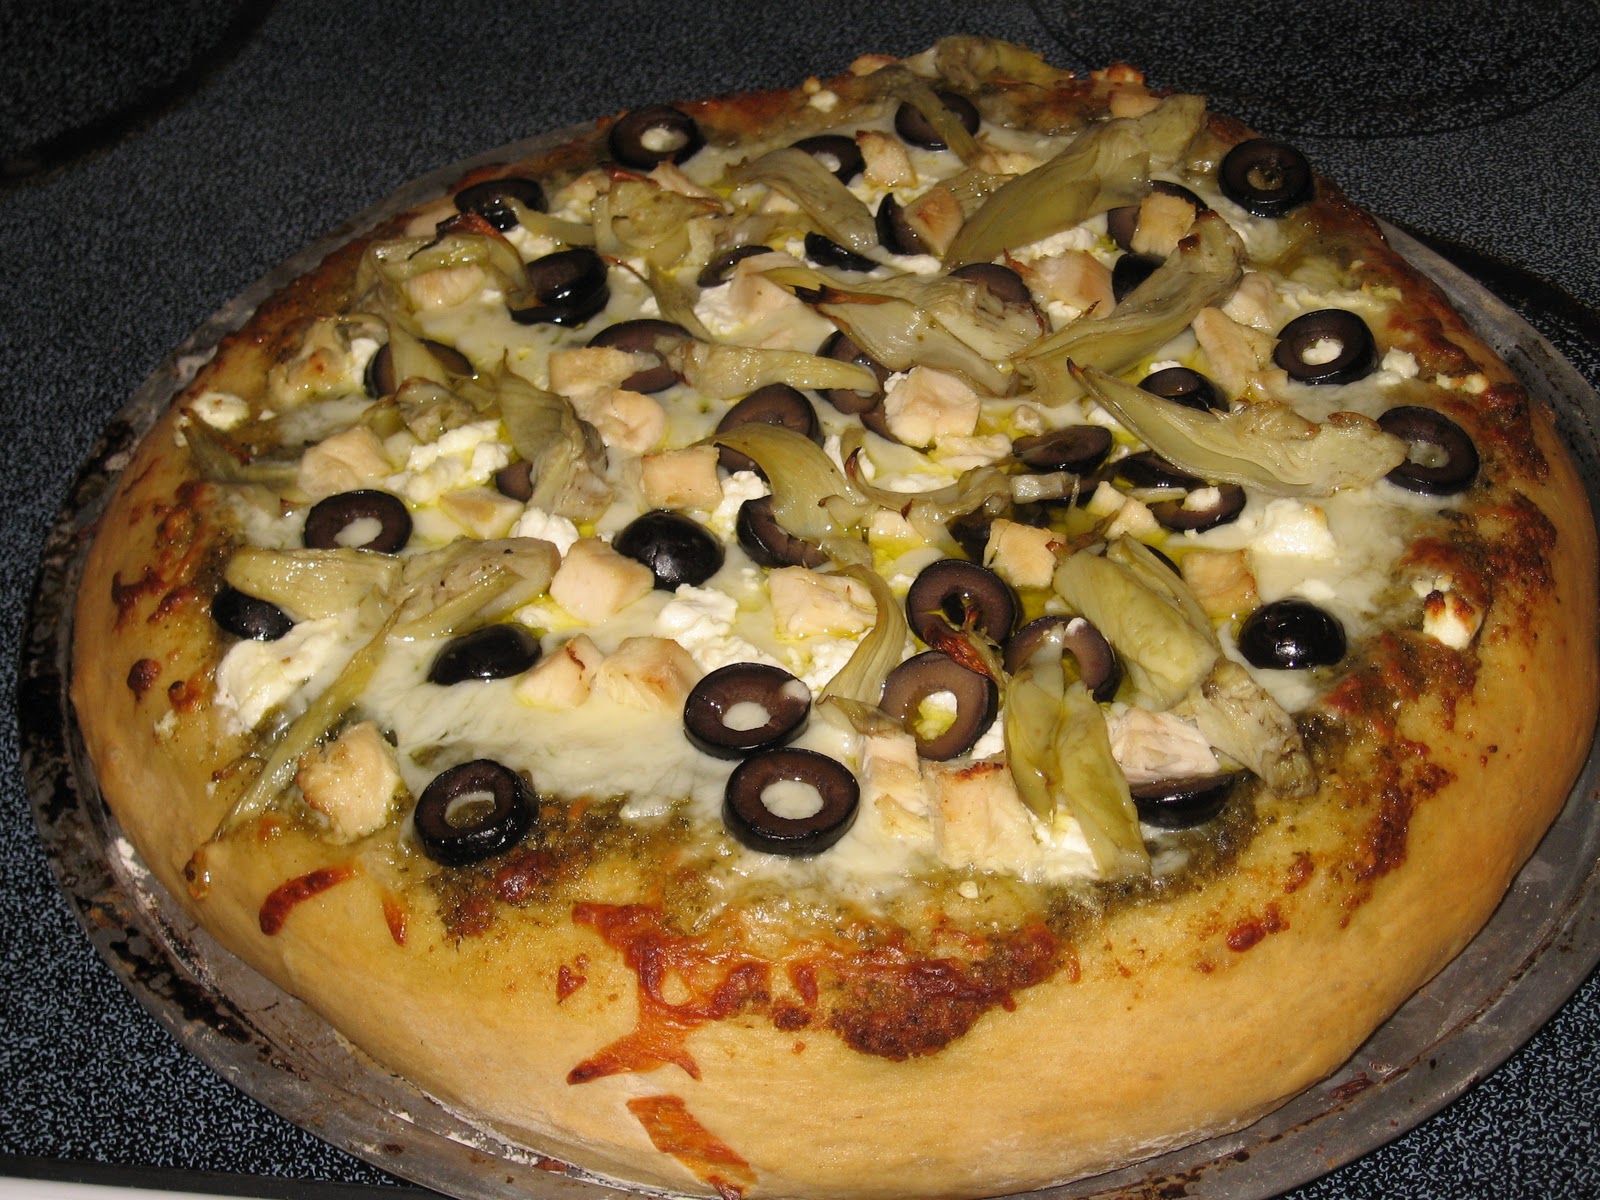
This one has pesto, chicken, olives, artichoke hearts, mozzarella cheese and goat cheese on it.
     Enjoy!  Let me know if you make one or if you want a non-bread machine recipe for pizza dough!

Baked apples

     After the success of last week's (or was it the week before?) applesauce, Scott and I decided to buy a whole bunch of apples at saturday's farmer's market.  I decided to buy a variety of apples (as recommended by Mark Bittman) and cook them all up.  There are many possibilities for this many apples.  One of them is baked apples. 
     Baked apples are delicious.  If you have never made them, I recommend going out and making them now!  They are a delicious very "desserty" snack that also happens to be good for you.  I am also fortunate that I own an "apple baker", a piece of pottery that allows you to bake the apples from the inside out.  Now, if you don't own one, please don't despair.  It is very easy to bake apples in the oven without some fancy piece of equipment.  Here is how I did it (keep in mind I only have two apple bakers).

Baked Apples

Ingredients:

2 apples (I believe I used Braeburn but am not 100% certain)
1/4 cup sugar
1 tbsp flour
3/4 tsp cinnamon
1/8 cup melted butter
chopped walnuts
2 tbsp water

(Whoo! I had to do a little math there as the recipe is for four apples!)

Procedure:

1) Peel and core the apples.  The instructions don't mention peeling, but I thought the ingredients would stick better to the apples if it was peeled.  From the final result, I seem to be right...
2) Mix together the sugar, flour and cinnamon. (The flour in this recipe will turn the juice into caramel).
3) Roll apples in the melted butter and then in the sugar mixture.  Put on the post of the apple baker.
4) Put on the nuts and add the water.
5) Bake at 350 for 35-40 min (I baked it for about an hour and it turned out really well!)
6) Enjoy!


Yum!  Here are the pictures:
Here is the apple baker.  It is hard to tell, but there is a post in the middle
that goes through the apple to bake it from the inside out

Close up of cinnamon/sugar/walnut/caramel goodness..

Wednesday, January 26, 2011

Leftovers crustless quiche and sourdough attempt #2

     Before I start this blog, I would like to give a big thanks to my friend Keri.  She posted this recipe for her crustless quiche and it sounded so good that I had to try it that day.  My beloved husband (to be) went to the grocery store and picked up more eggs so we could make it.  It is a very simple recipe, it used a lot of stuff I just had hanging around the fridge and best of all it was delicious! 
http://kiwikeri.blogspot.com/2011/01/crustless-quiche.html

Some ingredients that go well in this dish are:

rice of any kind or flavor
lentils
broccoli
bacon
any leftover meat
hash browns even frozen ones
yellow squash
mushrooms
quinoa
or anything else you can think of


HOW TO MAKE CRUSTLESS QUICHE:


1. preheat over to around 375
2. pull out all leftovers and assorted veggies from fridge
3. cut all veggies into small pieces trying to keep sizes uniform
4. put all your veggies into a glass pie pan, drizzle with olive oil, season with salt pepper, other seasonings ex. turmeric, Italian seasonings, garlic or garlic powder, etc. and stir until evenly coated
5. add meats and cheeses and stir again
6. fill pie pan close to full with yummy nibbles
7. Crack lots of fresh eggs, add a splash of milk (I use rice milk) and whisk. Usually requires 8-12 eggs
8. pour eggs into pie pan until all veggies and meat are covered with egg. You may need to crack more eggs if you have a lot of goodies in your pan.
9. cover with foil and carefully transfer to oven.
10. bake until mostly solid, then remove foil and bake until a knife comes out clean or the eggs in the center look fully cooked

     So, what did I put in it?  Leftover enchilada filling (chicken, cheese and onion) and leftover bread filling (corn and olives).  I ended up having to bake it for about 40 min uncovered and 20 min covered.  I am not sure if that is the right timing or not, as I also had bread baking in the oven as well.  It came out very good, but would have been better with green chiles and more cheese (what wouldn't have?).  But that is something to try for next time... I definitely think this is going to become one of my regular recipes.

     Which brings me on to the bread I tried to make.  I tried to make a Cornmeal sourdough bread with green chiles, corn and cheese.  Because of the sticky disaster that happened when I tried to make it by hand last time, I decided to try a recipe in my bread machine.  Long story short, I found out what happens when you put too much stuff in the bread machine.  It spilled all over its container into the bottom of my machine and even pushed the top up!  I had to finish baking it in the oven (thus the competition with the crustless quiche).  The bread came out well, but I didn't really taste any sourdough or green chile taste.  Scott said that it looked like a roast chicken when it came out.  What do you think?

Leftovers quiche

Green chile cheese cornmeal sourdough


Do I really look like a roast chicken?

Our dinner plate (with the ubiquitous salad)


Happy eater (while watching Julia Child)


Sunday, January 23, 2011

Homemade applesauce

     "So what do you want for Christmas, little girl?"  "I want a food mill to make applesauce!"  And that is indeed what I got!  Thanks to my mother's birthday/Christmas gift, I finally got a food mill of my very own.  It arrived last week and it took me until today to figure out how in the world to put it together.  Not that it is really that hard as it only consists of three parts; the main frame, the disc with the holes and the spinney part (love my technical language?).  I was playing around with it today and it finally just fit together!  I knew that I could finally make the recipe I have wanted to make for a while now: Applesauce!

Applesauce
makes about 2 quarts
Time: About 1 hour

Ingredients:
5 lbs apples, preferably a mixture of varieties, washed
Sugar if necessary

Procedure:

1) Cut the apples in half or, if they're very large, in quarters.  Don't bother to peel or core them. Dump them into a pot with about 1/2 inch of water on the bottom.  Cover the pot and turn the heat to medium.

2) When the water begins to boil, uncover the pot.  Cook, stirring occasionally and lowering the heat if the mixture threatens to burn on the bottom, until the apples break down and become mushy, at least 30 minutes.  let sit until cool enough to handle.  Taste the mixture and add sugar if necessary; usually it is not.

3) Pass the mixture through a food mill, discarding the solids that stay behind.  Freeze or refrigerate.

     It really is that easy!  And that delicious!  I used a mixture of apples, most of which I bought at New Leaf's (a local natural food store).  I used Pink Ladys, Honeycrisp and two random red apples from work.  At first, I was obsessed with poundage and then realized it didn't really matter how many apples I used exactly.  Since they were small apples, I cut most of them in half, put them in the pan and started cooking.  I'd say it took about an hour rather than a half an hour for them to cook down to very mushy, but I was using a stock pot (the narrowness of it probably delayed the cooking time).  Then I put the food mill over another pot, poured some of the mixture in it, and turned.  It was super easy!  And, as Mark Bittman said, it didn't require any sugar!  Yum!  I can hardly wait to tell Marie (who make applesauce every year or so and peels and cores the apples by hand).  She'll flip!


The apple "mush" in the pot


Putting it through the food mill


The homemade applesauce


Can you see the steam?


Of course, you have to enjoy it afterwards!  Yum!