Thursday, February 25, 2016

Homemade chicken soup from scratch

   Earlier this month, in the week leading up to the Super Bowl, both my husband and I were quite sick.  :-(  Poor Scotty caught the flu and I caught something that was a strange combination of both a cold and a flu.  Combined, we were two sick, miserable people sharing a small bed and probably getting each other even sicker.  What could possible cure our ills?  Homemade Chicken soup!
A wonderful bowl of homemade Chicken noodle soup
    How should I make a delicious health-giving soup?  First, let's start with the broth.  I wanted to make a bone broth, which is basically a chicken stock/broth that has been cooked so long that the nutrients from the bones leech into the liquid, creating a nutritious and delicious broth.  This seemed like just the kind of thing a sick person would need!  I used the same stock recipe that I have cooked before (see http://insearchoftheperfectmacaroniandcheese.blogspot.com/2011/01/homemade-chicken-stock.html) except this time I cooked it in my slow cooker for way way way longer.  I'm talking sixteen hours!  I started my broth the night before and had it cook until well into the afternoon.  By the end, the bones were literally dissolving into the soup.  The aroma made the house smell wonderful and the taste was divine!   Just one sip gave you energy and just felt nutritious.  I have tried making stock in the slow cooker before, but never for this long; I am definitely going to have to do this again.

All of the ingredients are in, ready to be turned into nourishing bone broth.
Same stock, sixteen hours later...
 Okay, so now I've got the broth, let's go onto the soup!
Here is what the finished soup looked like.

Homemade Chicken Soup from Scratch

Ingredients:


Homemade chicken (bone) broth

Chicken from bone broth, shredded
6 medium carrots, sliced
2 large onions, chopped
6 celery stalks, sliced
1 bag German egg pasta
Olive oil
Salt 
Pepper
Italian seasoning


Procedure:

1. Cut up onions, carrots and celery.
2. Heat up some olive oil in the bottom of a large pot (I used my dutch oven) and add in the vegetables until they are soft.
3.  Add bone broth, chicken and pasta.
4.  Cook the soup for ten to fifteen minutes or until all the ingredients are cooked to your liking.
5. Season with salt, pepper and Italian seasoning.
6. Enjoy!

  The soup was every bit as amazing as I hoped that it would be.  The broth was to die for, and the other ingredients just made you feel good.  This was exactly what Scott and I needed to help us through our sickness.  Plus, this made A LOT of food.  We had chicken soup for about a week straight and then froze the rest.  The only complaint that I had is that when I refrigerated the soup (with the noodles in it), the noodles absorbed all of the wonderful broth.  It turned from chicken soup to chicken casserole.  I suppose this just goes to show that it was real homemade soup.  If you decide to make this soup, I recommend keeping the noodles separate from the soup when you store it so you can continue to enjoy this wonderful, health-giving concoction!

Monday, January 25, 2016

Pupusas

     Last year, I discovered that delight of Salvadoran cuisine, pupusas.  These delightfully crispy, cheesy and savory creations tickled my taste buds (if you'll pardon the cliche) and I knew that I had to try to make them.  They couldn't be that hard, I thought.  However, between one thing and another, I delayed.  Not any longer!  Last night, I gathered up the guts (and the ingredients) and made fresh, homemade pupusas.
     I used a combination of recipes: one from a website I found on thekitchn.com, one from my cookbook (which I bought specifically for the pupusa recipe), lonely planet's The World's Best Street Food, where to find it & how to make it and a number of YouTube videos. 
     Note: Pupusas are traditionally served with a side of curtido, a lightly fermented vegetable mixture (kind of like sauerkraut).  I already had some at home as I had brought home pupusas for Scott this week.  Check out the kitchn website if you'd like to make your own.  They also have good pictures of the dough and an alternative way to fill your pupusa.

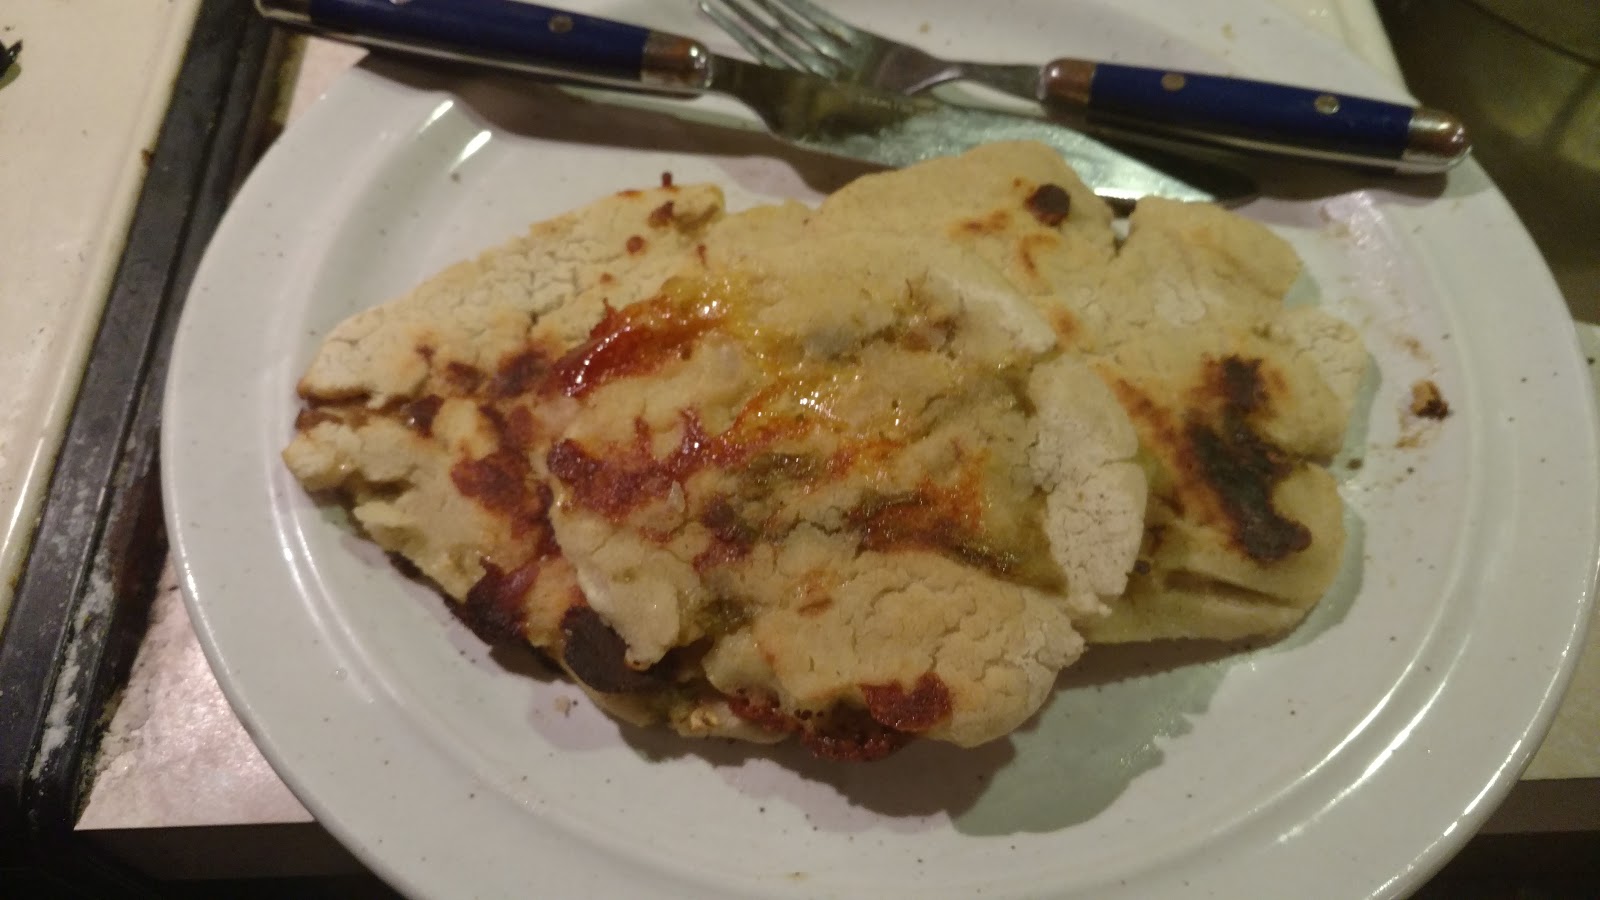
My homemade (imperfect, but still delicious) pupusas
Frying up the pupusas.  You can see the points where the cheese melted and crisped up.  Yum!


Pupusas (a combination of recipes from The World's Best Street Food and http://www.thekitchn.com/recipe-salvadoran-pupusas-con-curtidorecipes-from-the-kitchn-176284 and my own).

Ingredients:
2 cups masa harina
1 1/4 cup warm water
grated cheese (I used quesadilla)
green chile peppers, grated
curtido, if desired

Procedure:

1) Mix masa and warm water together until you get a dough that is the consistency of play dough.  Let the dough rest for ten minutes.
2) Shred the cheese and chop the green chiles.
3) Heat up a cast iron skillet over high heat.
4) Grab a handful of the dough (about the size of a golf ball or so) and flatten it out in between your two hands.  Make a little level in the dough and put some cheese and chiles in there.  Cup your hand and seal the end.  Flatten the pupusa again, this time with the filling inside.  Don't worry if you have some cracks.
5) Put the raw pupusas on the cast iron.  You can heat them in oil if you'd like or just on the skillet itself.  Leave on the skillet for five minutes or so, then flip.  Make sure both sides are crispy brown.
6) Serve with curtido and enjoy.

     The results?  Delicious, but I definitely still need to work on my technique!  There was not quite enough filling and I think my masa dough was a little too dry; the pupusas would crack and filling would spill out.  Fortunately, I read on one of the many recipes (alas, I forget which one) to not worry too much if this happened as any spilled cheese would just crisp up.  I decided to go for quesadilla cheese (labeled, literally, quesadilla).  This turned out to be the perfect choice as any spilled cheese just crisped up and became quite delicious.  In fact, it was so delicious that I tried cooking some on its own on the cast iron to try to make a cheese crisp.  Definitely recommended!  I forgot about the accompanying curtido until the very last batch, but found it was a welcome addition.  I think next time I am going to try to make my own curtido (future blog?); I can make sauerkraut, so why not?  I definitely still need to work on my technique and dough recipe a bit.  However, with such delicious results, how can I go wrong?

Tuesday, January 19, 2016

Bolognese sauce with homemade pasta


Beef Bolognese sauce with homemade pasta
      I have been dreaming of making Bolognese sauce ever since I first read about it in by go-to cookbook, Mark Bittman's How to Cook Everything.  It sounded amazing, but for some reason I never got around to cooking it.  Years later, I bought an Italian cookbook called The Essentials of Classic Italian Cuisine by Marcella Hazan, highly recommended by a fellow-foody and friend of mine, Rachel Harker.  Alas, this book also sat for months and months (are you sensing a theme here?), until the cold weather, full weekend and a desire to use my Le Creuset dutch oven again finally motivated me enough to go out and just do it!  The results were well worth the wait!

The finished Bolognese sauce.  Meaty, rich and delicious!
My homemade tagliatelle pasta was the perfect accompaniment for the sauce.

Bolognese meat sauce from The Essentials of Classic Italian cooking by Marcella Hazan

Notes:

Ragu, as the Bolognese call their celebrated meat sauce, is characterized by mellow, gentle, comfortable flavor that any cook can achieve by being careful about a few basic points:


  • The meat should not be from too lean a cut; the more marbled it is, the sweeter the ragu will be.  The most desirable cut of beef is the neck portion of the chuck.
  • Add salt immediately when sauteing the meat to extract its juices for the subsequent benefit of the sauce.
  • Cook the meat in milk before adding wine and tomatoes to protect it from the acidic bite of the latter.
  • Do not use a demiglace or other concentrates that tip the balance of flavors toward harshness.
  • Use a pot that retains heat.  Earthenware is preferred in Bologna and by most cooks in Emilia-Romagna, but enameled cast-iron pans or a pot whose heavy bottom is composed of layers of steel alloys are fully satisfactory.
  • Cook, uncovered, at the merest simmer for a long, long time; no less than 3 hours in necessary, more is better
Makes: 

2 heaping cups. for about 6 servings and 1 1/2 pounds pasta

Ingredients:

1 tbsp. vegetable oil
3 tbsp. butter plus 1 tbsp. for tossing the pasta
1/2 cup chopped onion
2/3 cup chopped celery
2/3 cup chopped carrot
3/4 lb. ground beef chuck (see prefatory note above)
salt
black pepper, ground fresh from the mill
1 cup whole milk
Whole nutmeg
1 cup dry white wine
1 1/2 cups canned imported Italian plum tomatoes, cut up, with their juice
1 1/4 to 1 1/2 pounds pasta
Freshly grated parmigiano-reggiano cheese at the table

Recommended Pasta:

There is no more perfect union in all gastronomy than the marriage of Bolognese ragu with homemade Bolognese tagliatelle.  Equally classic is Baked Green Lasgane with Meat Sauce, Bolognese Style.  Ragu is delicious with tortellini and irreproachable with such boxed dry pasta as rigatoni, conchiglie or fusilli.  Curiously, considering the popularity of the dish in the United Kingdom and the countries of the Commonwealth, meat sauce in Bologna is never served over spaghetti.

Procedure:

1) Put the oil, butter, and chopped onion in the pot, and turn the heat on to medium.  Cook and stir the onion until it has become translucent, then add the chopped celery and carrot.  Cook for about 2 minutes, stirring the vegetable to coat them well.
2) Add the ground beef, a large pinch of salt, and a few grinding of pepper.l  Crumble the meat with a fork, stir well, and cook until the beef has lots its raw, red color.
3) Add the milk and let it simmer gently, stirring frequently, until it has bubbled away completely.  Add a tiny grating,- about 1/8 teaspoon- of nutmeg, and stir.
4) Add the wine, let it summer until it has evaporated, then add the tomatoes and stir thoroughly to coat all ingredients well.  When the tomatoes begin to bubble, turn the heat down so that the sauce cooks at the laziest of simmers, with just an intermittent bubble breaking through to the surface.  Cook, uncovered, for 3 hours or more, stirring from time to time.  While the sauce is cooking, you are likely to find that it begins to dry and the fat separates from the meat.  To keep it from sticking, continue the cooking, adding 1/2 cup of water whenever necessary.  At the end, however, no water at all must be left an the fat must separate from the the sauce.  Taste and correct for salt.
5) Add the cooked drained pasta, adding the tablespoon of butter, and serve with freshly ground Parmesan on the side.

  The results?  Amazing and time-consuming!  This sauce takes an amazingly long time!  I started cooking at 11:30 a.m. and didn't have dinner until 6:45 p.m.  The sauce was cooking that whole time!  In addition to the pasta needing to simmer for three hours, it takes hours for all of the milk and all of the wine to cook off.  Also, once I added in the tomatoes, I couldn't quite get it at the perfect lazy simmer (the sauce would  wither bubble too violently or the flame would go out), but I did the best I could and it turned out great!  Considering, that the author said that there is no more perfect union in all gastronomy than the marriage of Bolognese ragu with homemade Bolognese tagliatelle, I knew I had to make fresh pasta to perfectly accompany this dish.  See my previous post about making ravioli for the fresh pasta at http://insearchoftheperfectmacaroniandcheese.blogspot.com/2011/02/fresh-pasta-aka-homemade-ravioli.html.  Only thing that changes is that instead of making ravioli, you simply roll the flattened pasta dough on itself and cut it into 1/4 inch strips to make extra-wide noodles.  This is most very definitely worth the extra effort; the pasta was cooked to perfection and matched beautifully with the sauce.  The sauce was rich, meaty, complex and absolutely amazing.  I served it with salad, bread and butter from the Parma region of Italy (I highly recommmend buying this butter if you ever find it; it is like eating sunshine on a field).  I will definitely be making this recipe again, especially for special celebrations!  I hope that you enjoy!


Monday, January 18, 2016

Vegetable Curry with Lamb

  After being MIA for all of 2015, I decided to take up blogging again.  Alas, I don't think I am going to be able to blog as much; a forty-hour work week on top of a three hour round trip commute really eats away at your cooking time!  However, I'd like to record at least some of the yummy things that I make!  Together, my husband and I made a New Year's resolution to eat more of a plant-based diet.  We have been trying to cook more at home to save our budget and our health!  I've been looking through my healthy cookbooks, especially The VB6 cookbook by Mark Bittman and came across this recipe.  I've always loved curries and I think you'll love it too!


Vegetable curry with lamb

Cooking in the pot.  Yum!


Vegetable Curry with Lamb from The VB6 Cookbook by Mark Bittman

Makes: 4 to 6 servings
Time: 1 to 2 hours, mostly unattended

Note: A classic curry- with lots of vegetables- is far simpler to make than you might think.  Just brown the meat; add the vegetables, stock, and aromatics; and let it simmer on the stove- it does its thing while you do yours.  This reheats beautifully too, making it the ideal meal for weeknight entertaining or freezing for ready-to-eat suppers on hectic nights.  Serve it with the bread on page 249 or brow rice (basmati is best here).

Ingredients:

2 tbsp. vegetable oil
1 lb. boneless lamb shoulder, cut into 1-inch chunks
1 tsp. salt
1/2 tsp pepper
1 large onion, halved and sliced
1 red bell pepper, chopped
1 zucchini, chopped
1 small head cauliflower (about 1 pound), chopped
1 tbsp. minced garlic
1 tbsp. minced fresh ginger, or 1 tsp ground dried
2 tbsp. curry powder
1/2 tsp cayenne (optional)
2 cups chicken or vegetable stock or water, or more as needed
1/2 cup Greek yogurt
1/2 cup chopped fresh cilantro leaves, for garnish

Procedure:

1) Put the oil in a large pot over medium-high heat.  When it's hot, add some of the lamb and sprinkle with some of the salt and pepper.  Cook, adjusting the heat and turning the pieces as needed so the meat doesn't burn, until it's well browned on all sides, 5 to 10 minutes.  As the meat browns, transfer it to a plate and continue adding more meat, seasoning it, and cooking the pieces until all the meat is browned.

2) Pour off all but 2 tablespoons of the fat and turn the heat down to medium.  Add the onion, bell pepper, zucchini, cauliflower, garlic, and ginger, and cook, stirring occasionally, until the vegetables being to soften, 5 to 10 minutes.  Add the curry powder and cayenne, if you're using it, and cooking, stirring constantly, until fragrant, 1 or 2 minutes.

3) Stir in the stock, scraping up any browned bits from the bottom of the pot, then add the browned lamb.  The meat and vegetables should be about halfway submerged in braising liquid, if not, add more liquid.  Bring to a boil, then lower the heat so the mixture barely bubbles.  Cover and cook, stirring every 30 minutes and adding small amounts of liquid if the stew ever looks dry, until the meat is tender enough to cut with a fork, another 15 to 30 minutes.

4) If the curry looks too watery, remove the lid, raise the heat a bit, and cook, stirring frequently, until it thickens.  If it looks too dry, add a little more stock or water and raise the heat until bubbly.  Remove from the heat.  Stir in the yogurt.  Taste and adjust the seasoning, then garnish with the cilantro and serve.

  Talk about eating the rainbow!  The vegetables alone are a colorful addition to this curry.  It was quite yummy and the lamb was delicious, but I would've wanted it maybe a tiny bit more creamy.  It is also a bit hard to tell from the recipe how long you should cook it; I ended up cooking it for about ninety minutes.  It was definitely worth it; yummy, healthy, spicy and went wonderfully with brown rice!

Monday, October 20, 2014

Pumpkin cinnamon rolls

     So I've had a serious addiction this month: pumpkin-themed foods!  I remember I used to scoff at all the pumpkin-themed foods that would come out around this time of year, laughing at all the fools that would fall into such an obviously commercial ploy.  Little did I know that, a few years later, I would be one of those pumpkin-addicted fools!  It seems to be the worst it's ever been and I can't seem to stop consuming (and buying) anything and everything with pumpkin in it.  So, with that in mind, when I came across a recipe for pumpkin cinnamon rolls, it was just too amazing to resist!

Ooey Gooey delicious pumpkin cinnamon rolls
Look at all that cinnamon roll goodness!!
Pumpkin cinnamon rolls from http://foodwishes.blogspot.com/2012/10/pumpkin-cinnamon-rolls-least-scary.html


Ingredients for 16 Pumpkin Cinnamon Rolls:
(I used a deep 13 x 9 baking dish)
Bake at 350 degrees F. for 30 minutes 

For the dough:
1 package of dry yeast
1/4 cup very warm water (about 100-105 degrees F.)
1/2 tsp white sugar
1/2 cup pure pumpkin puree (not pumpkin pie filling)
1/4 cup heavy cream (can sub milk, but cream is better)
1 tsp fine salt
1/4 cup melted butter
1/2 tsp vanilla extract
3/4 tsp pumpkin pie spice (or 1/2 tsp ground ginger and 1/4 tsp allspice)
1 large egg
1/4 cup granulated sugar
3 to 4 cups all purpose flour (divided), as needed 
 (add enough flour to mixer so that dough just barely pulls away from sides, and a very soft, slightly sticky dough is formed)
*knead for at least 6-7 minutes

For the filling:
5 tbsp melted butter, brushed on rolled dough
3/4 cup packed brown sugar
1/4 cup of granulated sugar
2 tbsp ground cinnamon

*For the glaze:
1/4 cup room temperature cream cheese
1 cup powdered sugar
1/4 cup milk, or as needed
1/4 tsp vanilla extract, optional
*adjust glaze by adding more powdered sugar or milk to achieve desired consistency
1/4 cup toasted pumpkin seeds to garnish
http://youtu.be/x6-tziWozrQ


     Thank you once again Chef John for an amazingly sweet and delicious treat!  Pumpkin cinnamon rolls are just good cinnamon rolls, period.  There is not a strong pumpkiny taste, but nor does there have to be with the deliciousness of cinnamon rolls.  The only problem I had with them was that they were too good; I kept meaning to bring some in to share with my co-workers but I just kept eating them at home!  Definitely well worth the effort to make them!

Broiled Tilapia Tacos

     This was a delightful idea that came from a craving for Fish tacos.  After my craving hit, I looked around for recipes and finally settled for one from the latest addition of Cuisine at Home.  As you can see down below, the results were amazingly delicious!

The whole spread
Delicious fish tacos
Broiled Tilapia Tacos from Cuisine at home issue no. 107 September/October 2014

Makes 4 servings (8 tacos)
Total time: 45 minutes

8 corn tortillas, wrapped in foil (6-inch)

FOR THE SLAW, TOSS:
2 cups angel hair coleslaw

1/4 cup chopped fresh cilantro
1/4 cup each thinly sliced red onion and radishes
3 tbsp. olive oil, divide
2 tbsp. fresh lime juice, divided
salt to taste

FOR THE SAUCE, PUREE:
1/2 cup sour cream
1 avocado
1/2 jalapeno

FOR THE TILAPIA, COMBINE:
2 tsp. each ground cumin and garlic powder

1 tsp. each dried oregano, ground coriander, and kosher salt
4 tilapia fillets (4-5oz each)

Preheat broiler to high with one rack 4-5 inches from element and another rack in center.  Place tortillas on center rack.
For the slaw, toss together coleslaw, cilantro, onion, radishes 1 tbsp. oil and 1 tbsp. lime juice; season with salt
For the sauce, puree sour cream, avocado, jalapeno, and remaining 1 tbsp lime juice in a mini food processor; season with salt
For the tilapia, combine cumin, garlic powder, oregano, coriander, and 1 tsp. salt.  Brush both sides of tilapia with remaining 2 tbsp.oil and sprinkle with spice mixture. Transfer tilapia to a baking sheet, broil on top rack until flesh is firm , 7-10 minutes.
To serve, break tilapia into chunks and divide among tortillas.  Top tacos with slaw and sauce.

The broiled tilapia

    The results were amazing and surprisingly easy!  I think this is definitely going to be a go-to recipe for me in the future.  It also made me wonder why I don't eat fish more often; I've always thought fish was difficult to cook but the Tilapia came out great and was super easy.  I made a few substitutions, since I didn't have all of the ingredients.  Instead of a (boring!) jalapeno, I used Trader Joe's hatch valley salsa (about 3 tbsp).  I also didn't have coriander, so I used curry powder instead.  I think the result was very delicious.  The only thing that confused me is the fact that the amounts of spices, lime juice, etc. is different on the ingredient list as in the instructions.  I've actually made this recipe twice now, once with the (limited) proportions named in the instructions and once with the (more generous) proportions named in the ingredient list.  Both came out delicious, so I don't think it matters too much....

Wednesday, October 8, 2014

Cooking with pears

     On August 4, 2014 my husband and I had the awesome opportunity to go to Alhambra Valley and pick pears with good family friends of mine, Helen and Ed Pereira.  They are part of Alhambra Valley Pears and Beef and sell their wares to farmer's markets throughout the Bay area.  If you happen to live in the Bay area, definitely check them out at the Farmer's markets in Concord, Martinez, Pleasant Hill, Walnut Creek, Danville, Orinda and Moraga.  They sell pears, apples and walnuts (a small amount in late September to early October) and grass-fed beef at the Martinez market on Sunday.  Here are some pictures of Scott and our time on the farm:

From left to right: Helen, Ed and Scott.


Contemplating all of our pears and pear picking..

Action shot...

Look at all those pears!
Going home with delicious pears....


     After our (not so) hard day's work, Helen and Ed generously gave us a whole box of green Bartlett pears to take home.  We put half in the fridge to use later and put half out to ripen on the counter.  Well, although I had all these good cooking intentions for the first half, Scott and I just ended up devouring them all.  We couldn't help it!!  I am not even really the biggest fan of pears, but I could not stop eating that scrumdidlyumptious fruit.  For the second half, they ended up ripening in the fridge, so I had sixteen ripe pears to play and cook with.  Here are the recipes I made:
Pear, Brie and Honey Quesadilla


Pear, Brie, and Honey Quesadilla


Yield: 1 quesadilla

ingredients:

2 (8 inch flour) tortillas
2 ounces Brie, sliced into long 1/4-inch slices, rind removed
1 Bosc pear, thinly sliced
4-6 red onion slices
1 tablespoon honey
1 tablespoon chopped fresh rosemary

directions:

1. Heat a 10-inch nonstick saute pan over medium-high heat. Place 1 tortilla in the dry pan. Evenly arrange the brie slices over the flour tortilla. Next, add the pear and red onion slices. Drizzle with honey and sprinkle with fresh rosemary. Place the other tortilla on top. Heat for about 3 minutes and then flip. Heat for another three minutes or until the cheese is melted.
2. Remove from pan and cut into wedges. Serve warm.

Put a tortilla on a hot skillet.  Add cut up brie cheese.
Then the sliced pears.
Next come the onions.
And the honey.  Look at that delicious melting cheese...
Rosemary as the final touch.
Cover with tortilla.  Heat three minutes.  Flip.
Delciousness on a plate.
Cut and serve
  All in all, this recipe was quite delicious!  The ooey gooey meltingness of the cheese combined with the sweetness of the pears and honey... yummy!  I made this dish twice in a row which gave me the option of flavor testing.  I would definitely recommend adding a little sprinkle of salt right at the end before you put the last tortilla on top.  It really brings out the savory flavors in a dish that may otherwise be a little bit too sweet.  Also, for me at least, the rosemary wasn't necessary and seemed to be a wee bit too intense when we did bite into it.  So, only add rosemary if you like that strong intense flavor.  I was a wee bit concerned when I added the onion that it would still be raw, but it actually cooks up quite nicely.  All in all, with the few modifications, a well balanced dish.

Pear pie

  My next recipe was inspired by the pear pie that Helen and Ed served to us after our delicious dinner after spending the afternoon picking pie.  As soon as I tasted pear pie, I knew I had to make it on my own.

Fresh Pear Pie from http://allrecipes.com/Recipe/Fresh-Pear-Pie/Detail.aspx?evt19=1
INGREDIENTS:
1 recipe pastry for a 9 inch double crust
pie
1/2 cup white sugar
3 tablespoons all-purpose flour
1/4 teaspoon salt
1 teaspoon ground cinnamon
1 teaspoon lemon zest
5 cups peeled and sliced pears
1 tablespoon butter
1 tablespoon lemon juice
DIRECTIONS:
1.Preheat oven to 450 degrees F (230 degrees C). Place a baking sheet on the bottom oven rack.
2.Combine sugar, flour, salt, cinnamon, and lemon zest in mixing bowl. Roll out half the pastry and line a 9-inch pie pan.
3.Arrange pear slices in layers in the pastry-lined pan, sprinkling the sugar mixture over each layer. Dot with butter and sprinkle with lemon juice.
4.Roll out remaining dough for the top crust. Use your finger dipped in a small bowl of water to moisten the rim of the bottom crust. Place top crust over filling, and trim edge using kitchen shears or a sharp paring knife. Fold edge under bottom crust, pressing to seal. Flute edge. Cut slits in top crust to allow steam to escape.
5.Bake in the preheated oven on the baking sheet for 10 minutes. Reduce oven temperature to 350 degrees F (175 degrees C), and bake until crust is golden brown and filling is bubbly, 35 to 40 minutes longer. Allow to cool several hours before serving.


The yummy filling

Topped with vanilla ice cream and blueberries


 The verdict?  Quite delicious, of course!  After reading the reviews on allrecipes.com, I decided to follow people's advice and mix all of the fruit/sugar/spices etc. all together and let it sit.  This time, I actually did follow the baking time and advice, although I didn't bake it for the full 35-40 minutes afterwards.  And I most very definitely did not wait "several hours" for it to cool!  By the way, the pie is delicious with vanilla ice cream and fresh blueberries on top.

     Finally, one last recipe.  This is the recipe that made me want to start cooking with pears in the first place: pear sauce.  Pear sauce is basically apple sauce but with pears.  I first had pear sauce over at Lynnelle's house and fell in love.  I asked her for the recipe, and this is what she said:

Peel a bunch of pears, and core them and cut into small chunks. Add some brown sugar and cinnamon to taste (for a large pot full of pear pieces, about a cup or half-cup of sugar works. And a tablespoon full of cinnamon). Add a pinch of salt. Cook and stir over medium heat until pears start to disintegrate (about 5 - 10 minutes). Stop and take off heat before chunks have all melted away. Cool and put into plastic bags to freeze, or can them using hot-water bath method. 

  Which is basically what I did.  Here are the pics:


Take a washed pear....
And peel it...
Cut it in half...

And core it...

Chop it into little bits...

Put all together in a pot...

Add cinnamon, sugar and a pinch of salt...

Put over heat..

And watch it shrink...

And shrink...

And shrink (especially with a potato masher)...

Looking yummy now!
The final result... delicious over vanilla ice cream!
     So the result was very definitely delicious and has lasted a long time in the fridge.  However, I realized a few things: 
1)  I should have cut the pears way smaller.  They didn't really melt down so eventually I just mashed them with a potato masher.
2) I think I had sixteen pears originally... all that gave me two small jars of pear sauce (about one pint).
3) It is a pain in the butt to peel and core that many pears!!  Goodness me but I hate peeling!
     Most very definitely worth it in the end.... particularly delightful over vanilla ice cream.  Well, that's all for now folks.  I'm back in full on crazy work mode, so my next blog post may have to wait a while.  Until we meet again...